
5/16/2016 Webmaster
Using The Cognitive Services Computer Vision API for OCR
You can leverage powerful services such as OCR (Optical Character Recognition) using Microsoft Cognitive Services.
Microsoft Cognitive Services
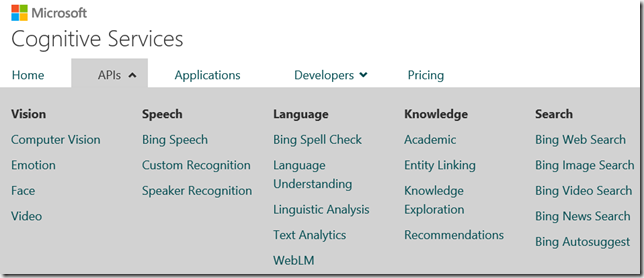
Microsoft Cognitive Services have a large number of API’s. However, we will only explore the Computer Vision API and its OCR method.
At the time of this writing, this feature is in preview and provides 5,000 transactions per month, but the price to use this feature in production is expected to be $1.50 per 1000 transactions.
Getting Started

The first step is to obtain your API keys to use the various Microsoft Cognitive Services APIs from this location:
https://www.microsoft.com/cognitive-services/en-us/sign-up

After you sign-up and then sign-in, navigate to the subscriptions page, and locate the Computer Vision section, and click Show next to either of the two keys they will provide to you, to view the key you will need to pass to the service to execute transactions.
You will need to perform these steps, and obtain a key, to run the sample code (available on the Download page) that this article covers.
The Sample Application
You can download the code from the Download page.
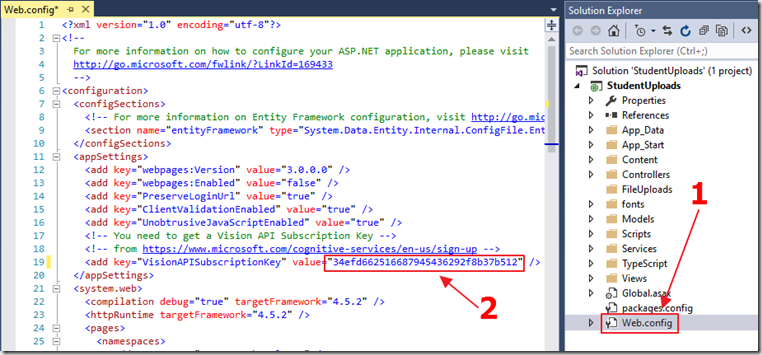
Open the code in Visual Studio 2015 (or higher) and then open the web.config file and enter your Computer Vision API key.
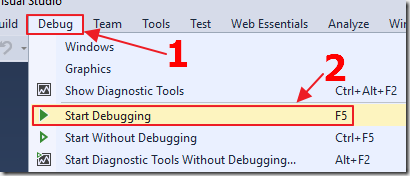
Save the file and hit F5 to run the application.
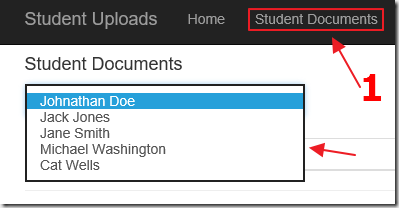
Click on the Student Documents tab and expand the list of students.
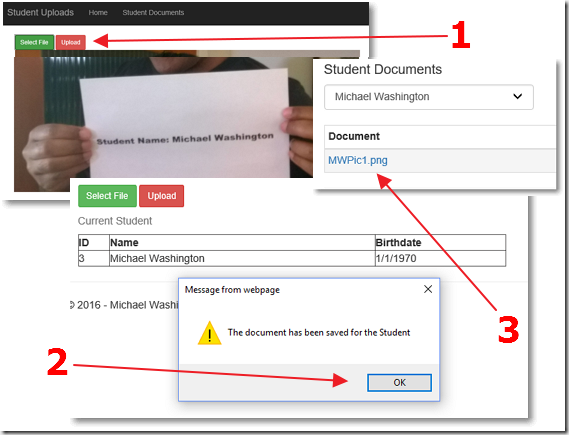
You can upload any image that contains the words Student Name: and then the name of the student, and it will be recognized and the file will be associated with the student.
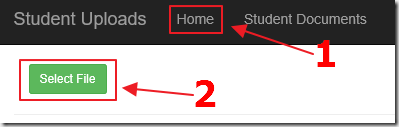
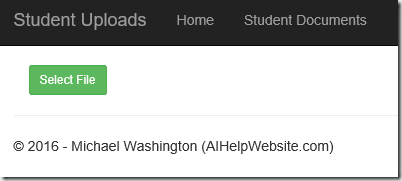
Switch back to the Home tab and click the Select File button.
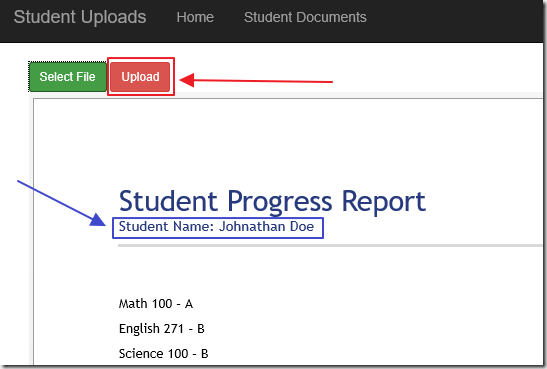
Select a file (.png files work best), then click the Upload button.
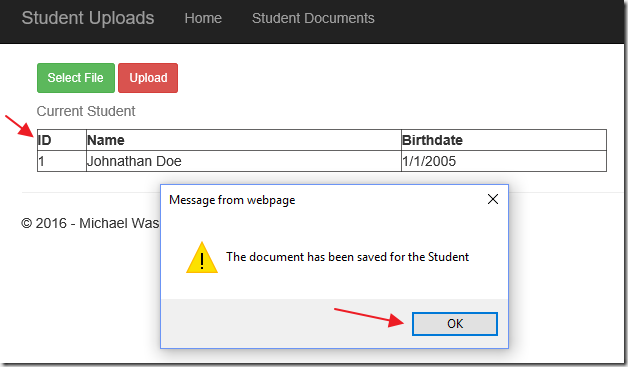
The image will be sent to the Microsoft Cognitive Services and OCR performed.
The OCR text returned will be parsed to obtain the student’s name.
If the student is found in the database, the image will be associated with the student.
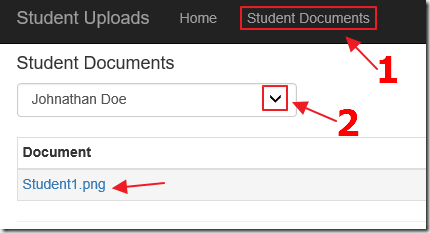
When you switch back to the Student Documents tab and select the student, you will see the document.
You can click on the document to view it.
How To Install the SDK
The first step is to install the assemblies from the SDK (Software Development Kit). The easiest way to do this is to get the microsoft.projectoxford.vision package from nuget.
You can go to Vision API Package in nuget for more details.
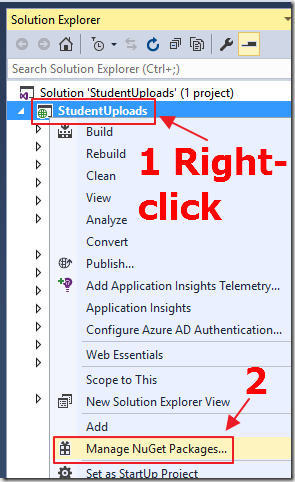
You can also use the NuGet Package Manager to install this in your own application.
Right-click on the Project node (not the Solution node) and select Manage NuGet Packages.
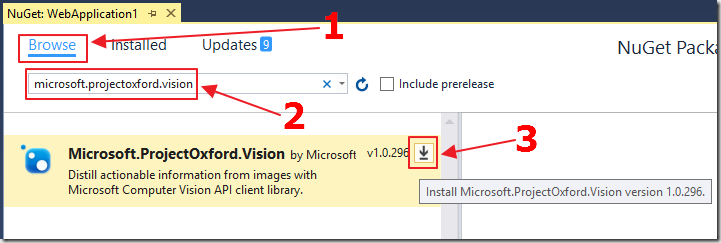
Next, select Browse, then enter microsoft.projectoxford.vision and press the Tab key.
The library will show, click on it to download and install it.
Code Walk-thru
The sample uses the following technologies:
- AngularJs- The most popular JavaScript framework for building modern web applications.
- OData 4 – This is used to provide server-side data endpoints that are called by the AngularJs code.
- TypeScript – This allows you to write JavaScript code that has strong typing and compile-time checking and validation.
After the file is selected and the Upload button is pressed, the following server-side method (in the FileUploadController.cs file) is called to actually upload the file to the server and then pass it to the Computer Vision API for OCR processing:
       [Route("Upload"), HttpPost]
        public async Task<IHttpActionResult> Upload()
        {
            string OCRText = "";
            if (!Request.Content.IsMimeMultipartContent())
            {
                this.Request.CreateResponse(HttpStatusCode.UnsupportedMediaType);
            }
            var uploadProcessor = new FlowUploadProcessor("~/FileUploads");

            await uploadProcessor.ProcessUploadChunkRequest(Request);
            if (uploadProcessor.IsComplete)
            {
                // OCR The File
                // Get Subscription Key
                string SubscriptionKey = WebConfigurationManager.AppSettings["VisionAPISubscriptionKey"];
                //
                // Create Project Oxford Vision API Service client
                //
                VisionServiceClient VisionServiceClient = new VisionServiceClient(SubscriptionKey);
                var root = HttpContext.Current.Server.MapPath("~/FileUploads");
                string imageFilePath = String.Format("{0}\\{1}", root, uploadProcessor.MetaData.FlowFilename);
                try
                {
                    using (Stream imageFileStream = File.OpenRead(imageFilePath))
                    {
                        //
                        // Upload an image and perform OCR
                        //
                        OcrResults ocrResult = await VisionServiceClient.RecognizeTextAsync(imageFileStream, "en");
                        OCRText = LogOcrResults(ocrResult);
                    }
                }
                catch (Exception e)
                {
                    return Ok(e.Message);
                }
            }
            // Return success (HTTP 200)
            // And OCR text
            return Ok(OCRText);
        }
This calls the LogOcrResults method to break up the regions returned by the API into separate lines:
        protected string LogOcrResults(OcrResults results)
        {
            StringBuilder stringBuilder = new StringBuilder();
            if (results != null && results.Regions != null)
            {
                stringBuilder.Append(" ");
                stringBuilder.AppendLine();
                foreach (var item in results.Regions)
                {
                    foreach (var line in item.Lines)
                    {
                        foreach (var word in line.Words)
                        {
                            stringBuilder.Append(word.Text);
                            stringBuilder.Append(" ");
                        }
                        stringBuilder.AppendLine();
                    }
                    stringBuilder.AppendLine();
                }
            }
            return stringBuilder.ToString();
        }
    }
The OCR results are returned to the oDataController.ts client-side code:
        FileComplete(file, flow) {
            var FlowFile: flowjs.IFlowFile = file;
            var FlowObject: flowjs.IFlow = flow;
            vm.ReadyToUpload = false;
            vm.UploadComplete = true;
            vm.CurrentStudentDocument = new StudentDocument();
            vm.CurrentStudentDocument.DocumentName = FlowObject.files[0].file.name;
            vm.CurrentStudentDocument.DocumentPath = FlowObject.files[0].relativePath;
            vm.OCRText = FlowObject.opts.OCRText;
            vm.ParseAndSetStudent();
        }
This calls the method to parse out the Student name:
        ParseAndSetStudent() {
            // Search for the words "Student Name:"
            var intStartPosition: number = vm.OCRText.search("Student Name:");
            // If "Student Name:" is not found
            if (intStartPosition === -1) {
                // Switch to start mode
                vm.ReadyToUpload = false;
                vm.UploadComplete = false;
                alert("Student Not Found");
                return;
            }
            // We found "Student Name:"
            // Parse out the student's name
            vm.OCRText = vm.OCRText.substr(intStartPosition + 14);
            var intEndPosition: number = vm.OCRText.search(" ");
            var strFirstName: string = vm.OCRText.substr(0, intEndPosition);
            vm.OCRText = vm.OCRText.substr(strFirstName.length + 1);
            intEndPosition = vm.OCRText.search(" ");
            var strLastName: string = vm.OCRText.substr(0, intEndPosition);
            // Set student to be searched for
            // in server-side code
            vm.CurrentStudent = new Student();
            vm.CurrentStudent.Id = 0;
            vm.CurrentStudent.FirstName = strFirstName;
            vm.CurrentStudent.LastName = strLastName;
            vm.SearchForStudent();
        }
This method calls the method to make a server-side call to see if the student is in the database:
        SearchForStudent() {
            // Get the name of the current user
            // Construct the path to the OData end point
            var urlString: string = vm.baseUrl
                + "odata/StudentDTO";
            var result: any = vm.$http({
                url: urlString,
                method: "POST",
                data: vm.CurrentStudent
            });
            // Process the result of the OData call
            // If successful, the Success method will be called
            // If not successful the Failure method will be called
            result.then(Success, vm.Failure)
            // Handle a successful call
            function Success(results: StudentResults) {
                vm.CurrentStudent = results.data;
                // If Id is 0 there was no match
                if (vm.CurrentStudent.Id === 0) {
                    // Switch to start mode
                    vm.ReadyToUpload = false;
                    vm.UploadComplete = false;
                    alert("Student Not Found");
                    return;
                }
                // Indicate that the Student was retrieved
                vm.StudentRetrievedComplete = true;
                // Save the document for the Student
                vm.SaveDocumentForStudent();
            }
        }
The server-side method (in the StudentDTOController.cs file) returns the full student record if the student is found:
        public IHttpActionResult Post(StudentDTO ParamStudentDTO)
        {
            StudentDTO objStudentDTO = new StudentDTO();
            // Search for the student -- return full record if found
            objStudentDTO = (from student in db.Students
                             where student.FirstName == ParamStudentDTO.FirstName
                             where student.LastName == ParamStudentDTO.LastName
                             select new StudentDTO
                             {
                                 Id = student.Id,
                                 FirstName = student.FirstName,
                                 LastName = student.LastName,
                                 Birthdate =
                                 SqlFunctions.StringConvert((double)student.Birthdate.Month).TrimStart()
                                 + "/"
                                 + SqlFunctions.DateName("day", student.Birthdate)
                                 + "/"
                                 + SqlFunctions.DateName("year", student.Birthdate)
                             }).FirstOrDefault();
            // If Student not found -- Return Id = 0
            if (objStudentDTO == null)
            {
                objStudentDTO = new StudentDTO();
                objStudentDTO.Id = 0;
            }
            return Ok(objStudentDTO);
        }
The following client-side method is called to make a server-side call to associate the uploaded file with the student:
        SaveDocumentForStudent() {
            var urlString: string = vm.baseUrl
                + "odata/SaveDocumentForStudent("
                + "StudentID=" + vm.CurrentStudent.Id + ","
                + "DocumentName='" + vm.CurrentStudentDocument.DocumentName + "'"
                + "DocumentPath='" + vm.CurrentStudentDocument.DocumentPath + "'"
                + ")";
            var result: any = vm.$http({
                url: urlString,
                method: "GET"
            });
            // Process the result of the OData call
            // If successful, the Success method will be called
            // If not successful the Failure method will be called
            result.then(Success, vm.Failure)
            // Handle a successful call
            function Success(results: any) {
                alert("The document has been saved for the Student");
            }
        }
Note: We would get 404 errors (due to the period in the filenames passed) if we did not alter the web.config file according to this article:
https://blogs.msdn.microsoft.com/davidhardin/2015/01/13/odata-action-gets-404-due-to-periods-in-url/
The following is the server-side method that creates a record to associate the uploaded file with the student:
        //odata/SaveDocumentForStudent(StudentID=1,DocumentName='doc1.png',DocumentPath='efeedoc1.png')
        [HttpGet]
        [ODataRoute("SaveDocumentForStudent(StudentID={StudentID},DocumentName={DocumentName},DocumentPath={DocumentPath})")]
        public IHttpActionResult SaveDocumentForStudent(
            [FromODataUri]int StudentID,
            [FromODataUri]string DocumentName,
            [FromODataUri]string DocumentPath
            )
        {
            // Save the document for the student
            StudentDocument objStudentDocument = new StudentDocument();
            objStudentDocument.StudentID = StudentID;
            objStudentDocument.DocumentName = DocumentName;
            objStudentDocument.DocumentPath = DocumentPath;
            db.StudentDocuments.Add(objStudentDocument);
            db.SaveChanges();
            return Ok(true);
        }
Links
Computer Vision API Version 1.0
Optical Character Recognition (OCR)
Download
You can download the code from the Download page