
3/27/2017 Webmaster
Creating Intelligent Web Applications With LUIS (Version 2)
The Microsoft Language Understanding Intelligent Service (LUIS) allows you to create intelligent applications that allow your end-users to use natural language to perform actions.
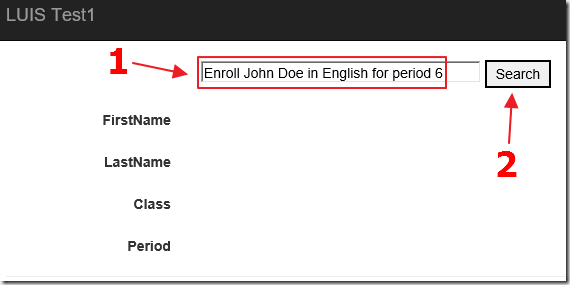
The sample ASP.NET C# MVC 5 application described in this article (you can download the code from the download page), allows the end-user to enter a normal human language sentence to indicate that they want to enroll a student in a class.
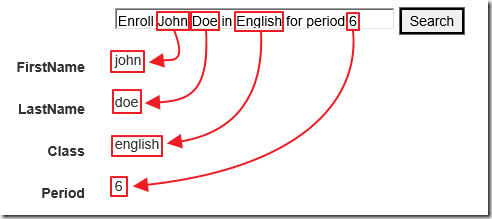
The application, using LUIS, is able to parse out the required elements to enroll the student.
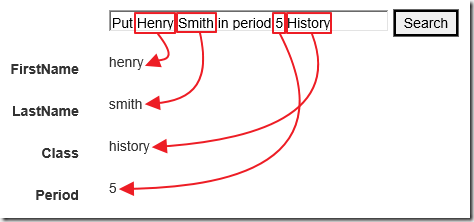
The application is able to understand a sentence even when it is constructed in different ways.
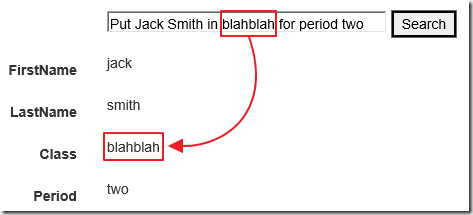
LUIS not only understands words, but more importantly context. In this example it is able to determine that “blahblah” is the name of the class that the student is to be enrolled in based on the context that the nonsensical word is used.
Using LUIS
The Language Understanding Intelligent Service (LUIS), allows developers to create language understanding models that are specific to their problem domain. To use LUIS, developers log into the website, enter a few utterances and their labels, and then deploy a model to an HTTP endpoint on Azure.
The utterances sent to the endpoint are logged and labeled using active learning. The website allows the developer (or any application administrator) to train the application by identifying issues, which can be resolved by either adding more labels or by giving hints to the machine learner in the form of features.
A developer can create and deploy a model in minutes, and then maintain and train it as the usage of the application grows.
To get started, go to: https://www.luis.ai, create an account, and sign in.
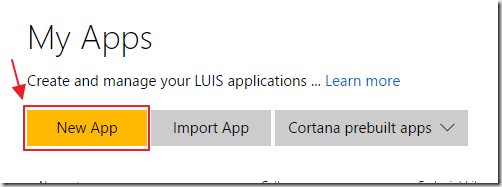
In the LUIS website, select New App then New Application.
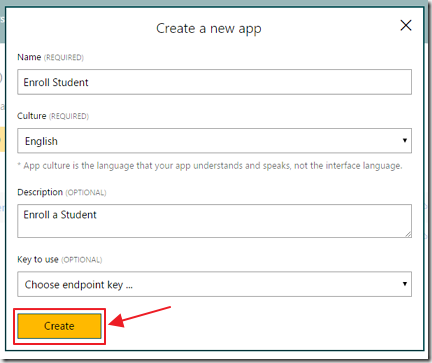
Fill in the application details and click Add App.
The application will be created.
Create Entities

Our application will need to detect three entities, Student Name (composed of First Name and Last Name), Class, and Period.
To create these, click the Entities link.
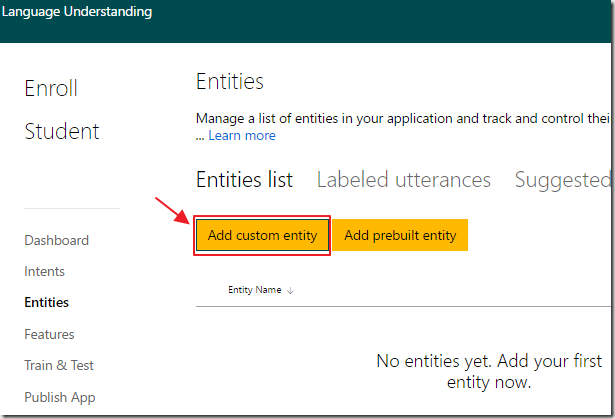
Click Add custom entity.
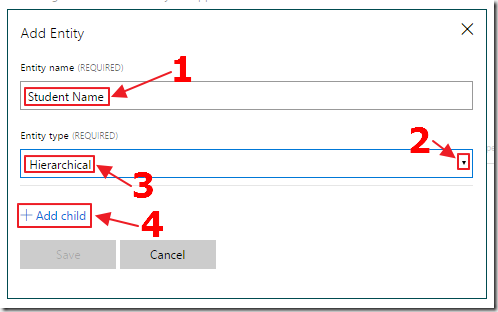
In the Add Entity dialog, enter Student Name for the Entity name, then select Hierarchical for Entity type.
Click the + Add child link.
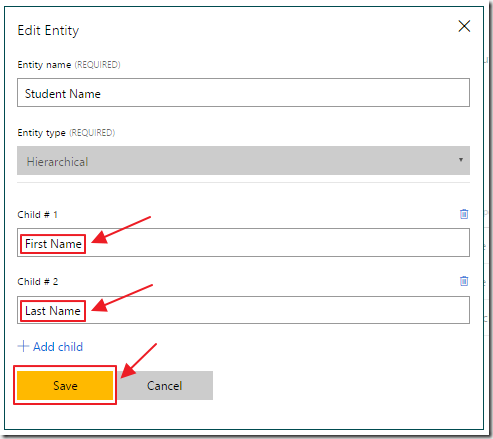
Enter First Name in the Child #1 box, then click the + Add child link again.
Enter Last Name in the Child #2 box, then click the Save button.
The Student Name will be created.
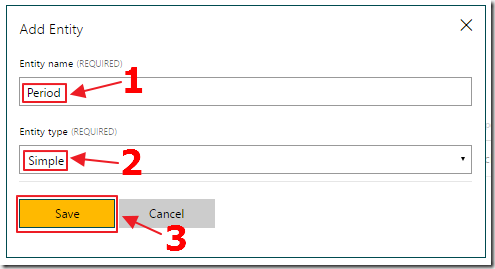
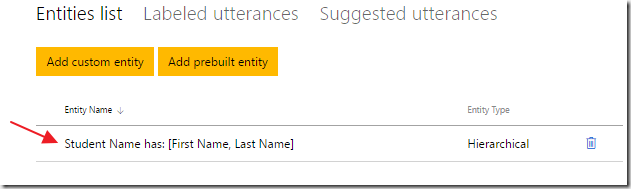
Create a Period entity, but set its Entity type to Simple.
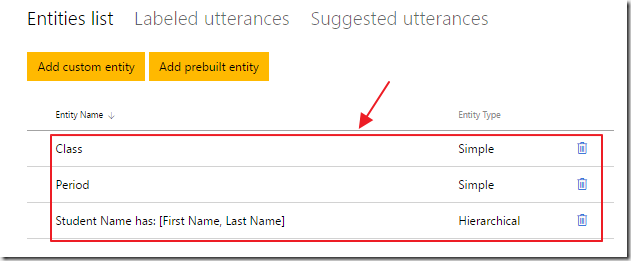
Add a Class entity so the complete list resembles the image above.
Create Intent
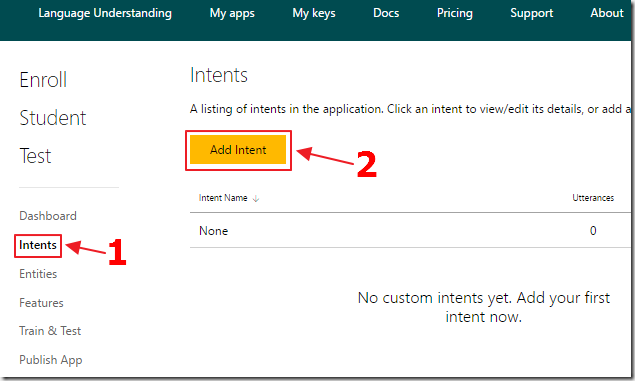
Our application will need to detect an Intent to Enroll.
To create this, select Intents then Add Intent.
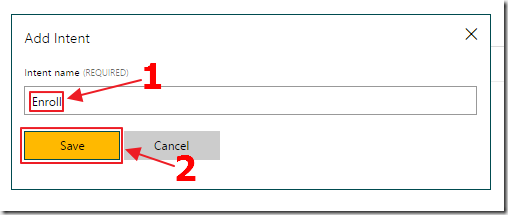
Enter Enroll for the Intent Name.
Click the Save button.
The Intent will be created.
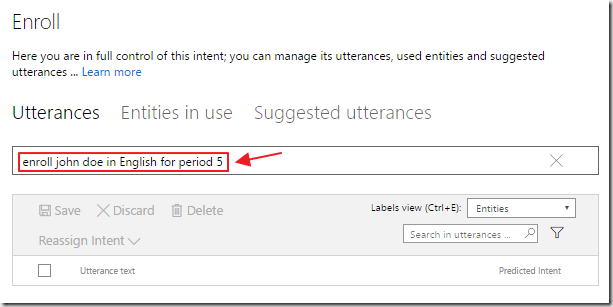
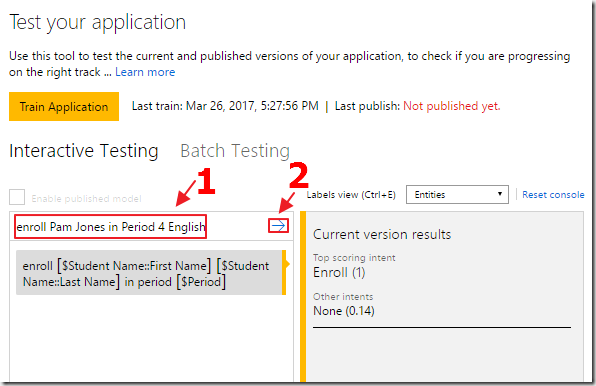
Enter a phrase that would use the Intent and press Enter.
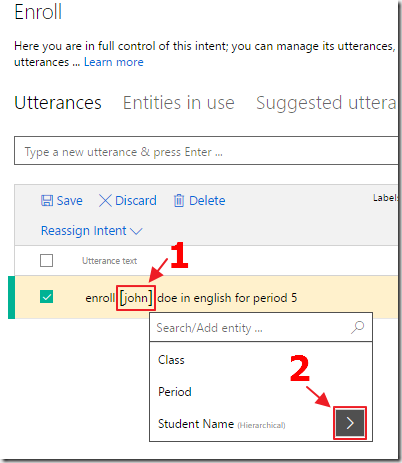
Click on the name John. A popup box will appear.
Click the expand right arrow next to Student Name
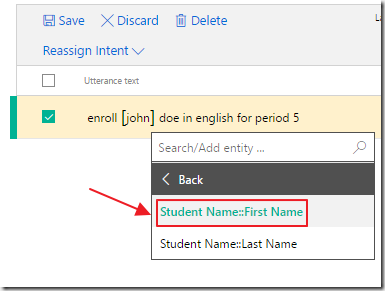
Select Student Name::First Name (to indicate that LUIS should learn that this is the first name).
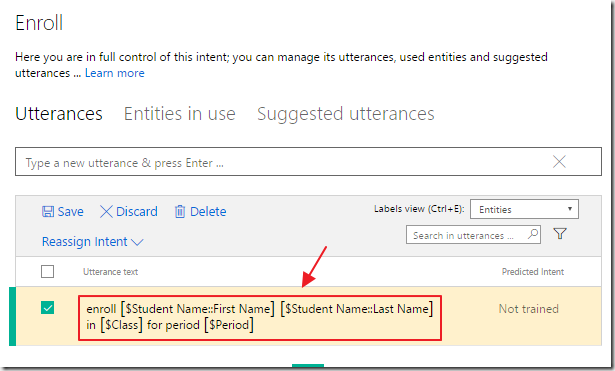
Click on each element and label it.
This is how you provide information to help train LUIS.
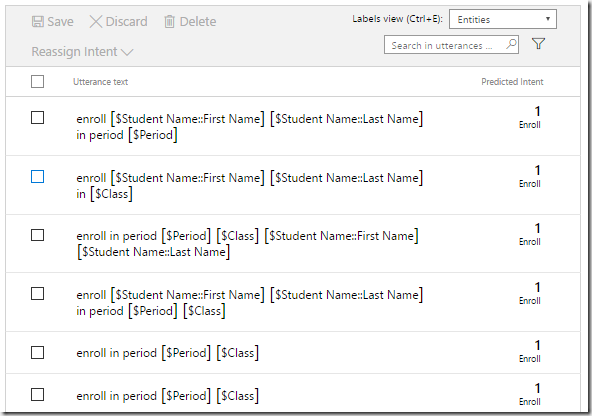
Continue to label utterances.
Enter and label at least nine different utterances.

Note that the Tokens view allows you to see and edit the original utterances.
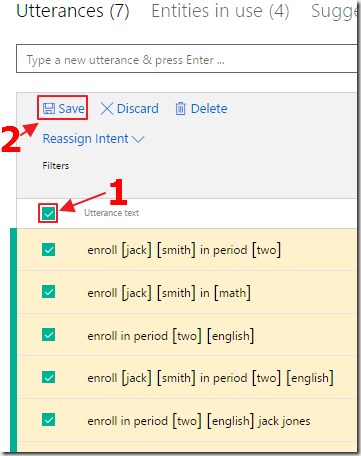
Ensure that you Save your utterances.
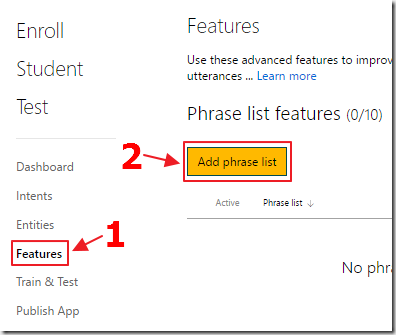
You can also help LUIS by entering common keywords in the Phrase List features section.
Click the Features link then click the Add phrase list button.
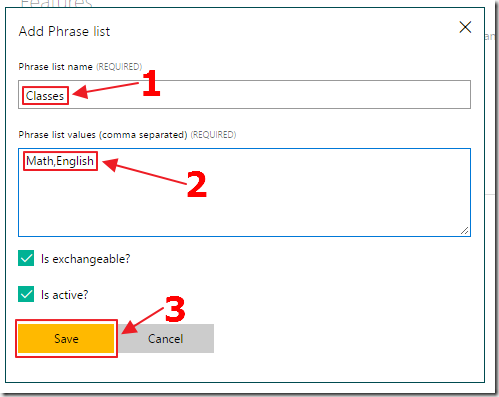
Give the list a name, enter the phrases (separated by commas) and click Save.
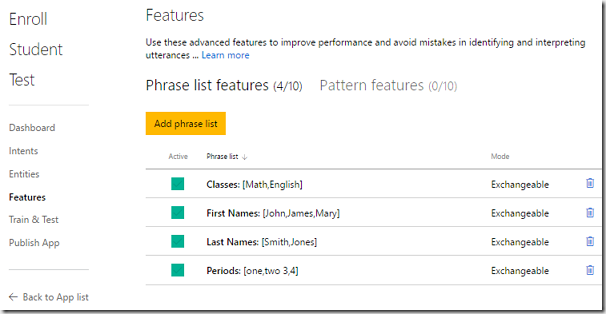
Note that Exchangeable means that what it learns about one phrase will be automatically applied to the others.
Train and Publish
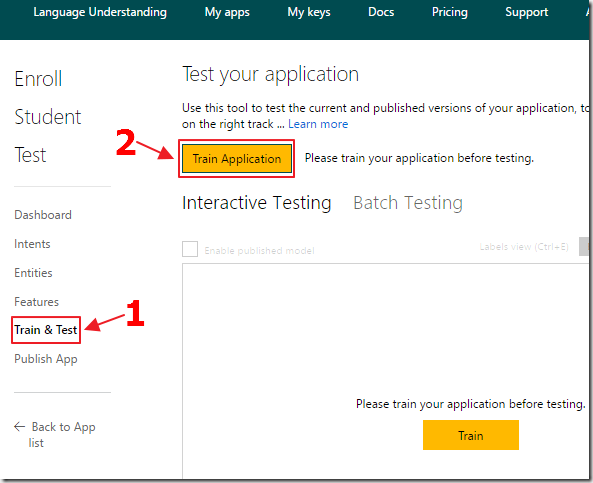
You need to Train the model before you can test it.
Click the Train & Test link then click the Train Application button to train the model.
You can now test the application.
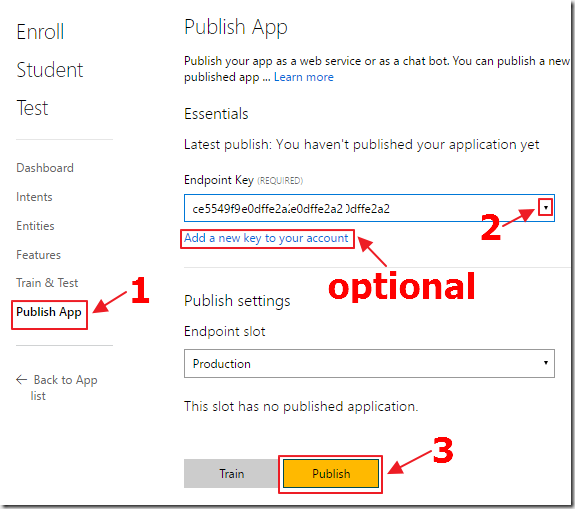
You need to publish the application before you can use it.
Click the Publish App link then select or create and select an Endpoint Key.
Click the Publish button.
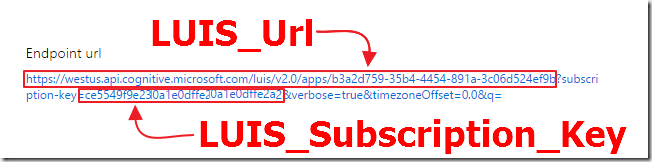
The published end-point will be displayed.
Make note of the LUIS_Url, and LUIS_Subscription_Key.
You will need these later to be used in the application that will be created later.
Create the C# Class For LUIS

For the application we will build, we now need to create C# classes to hold the expected results of the LUIS output.
To do this, copy the entire Enpoint url.
![]()
Paste it into a web browser, but add a valid query at the end.
Press the Enter key to submit the query.

A .json file will display (or a box to download it will appear).
If the download box appears, save the file and open it in a text editor such as Notepad.
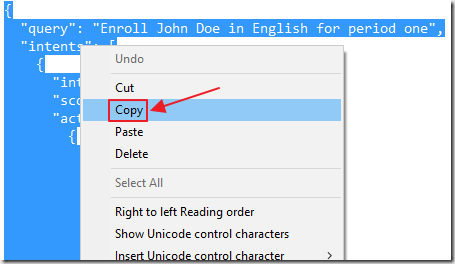
In either case, simply select all the contents and copy them.
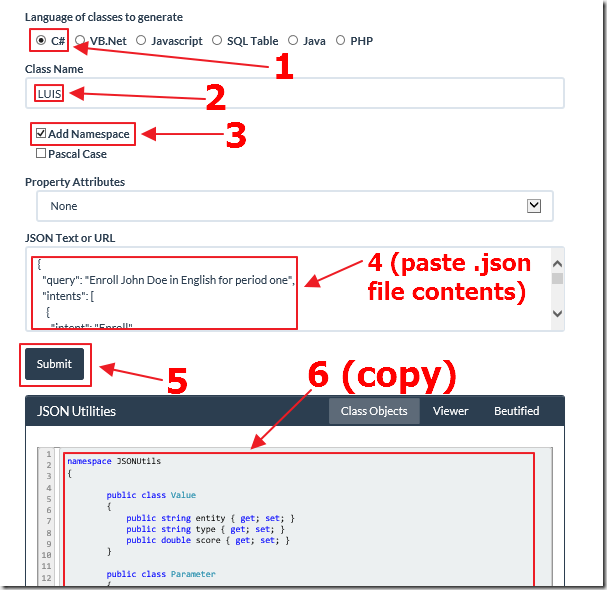
Go to:
http://jsonutils.com/ (or use Json Class Generator)
And paste the contents of the .json file.
Process it and copy the results.
Create The MVC Application
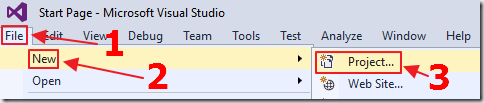
Using Visual Studio 2015, create a new Project.
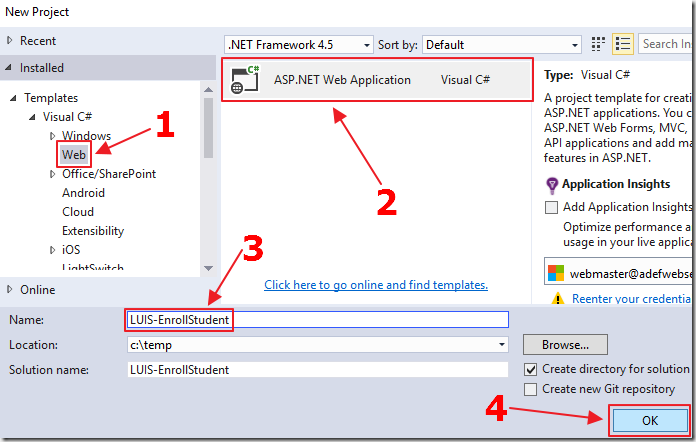
Create an ASP.NET Web Application.
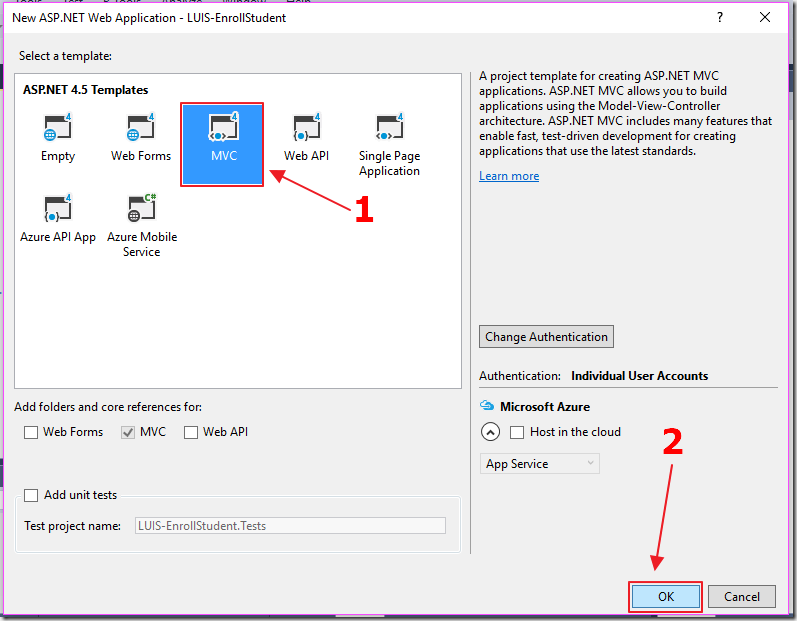
Create an MVC project.
The project will require a few special components.
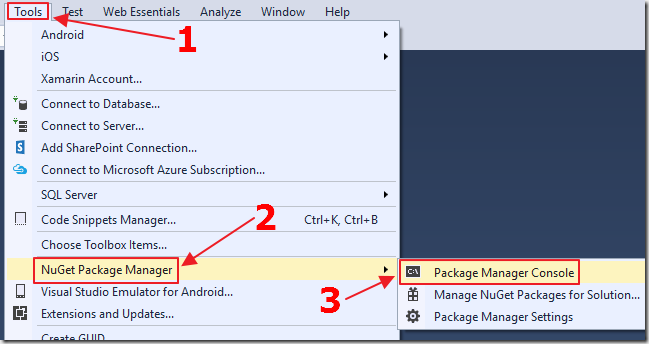
When the project opens, select Tools, then NuGet Package Manager, then Package Manager Console.
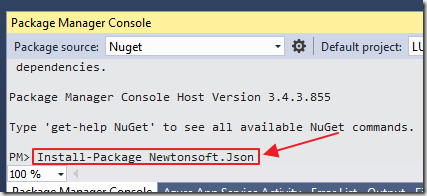
When the Package Manager Console opens, enter
Install-Package Newtonsoft.Json
Then press the Return key.
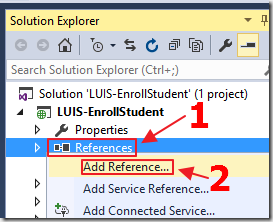
Right-Click on References and select Add Reference.
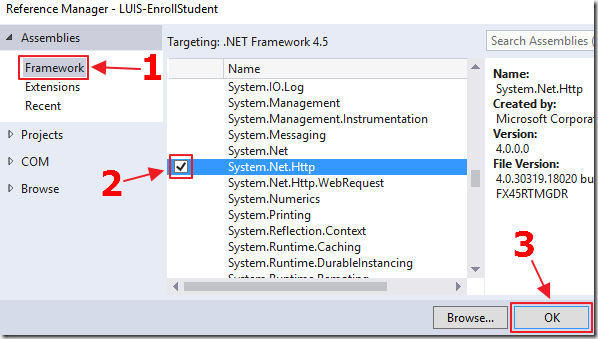
Select System.Net.Http and press OK.
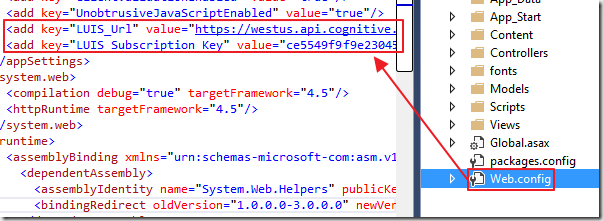
Open the Web.config file (the one in the root of the project, not the one under the Views folder)
Add the following keys, replacing the App and Subscription values with your own from the LUIS website:
    <add key="LUIS_Url" value="{put your Url here}" />
    <add key="LUIS_Subscription_Key" value="{ put your key here}" />
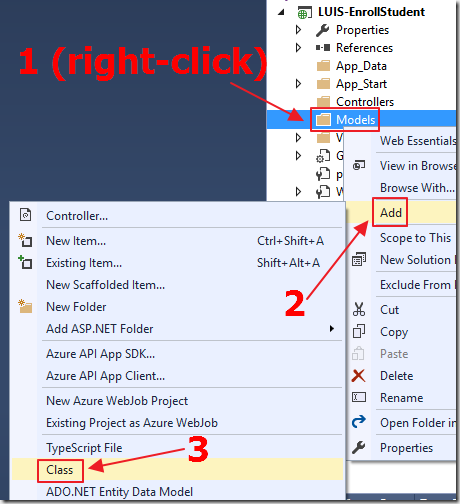
Now we need to create C# classes to hold the results returned from LUIS.
Right-click on the Models folder then select Add then Class.
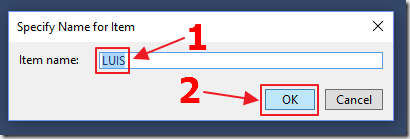
Name the class LUIS.
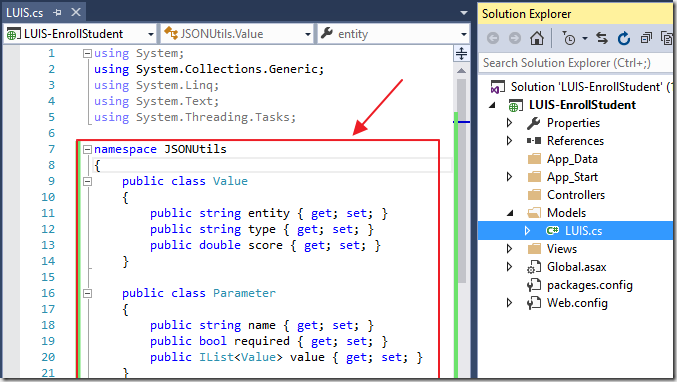
Paste the results from http://jsonutils.com/ (or Json Class Generator) into the file.
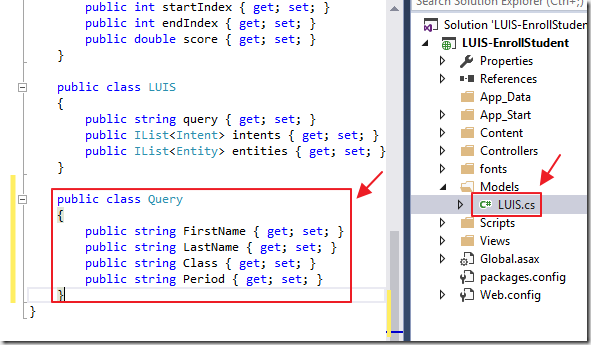
Add the following class to the file:
    public class Query
    {
        public string FirstName { get; set; }
        public string LastName { get; set; }
        public string Class { get; set; }
        public string Period { get; set; }
    }
This class will be used to display the final results on the page.
Open the Views/Home/Index.cshtml file.
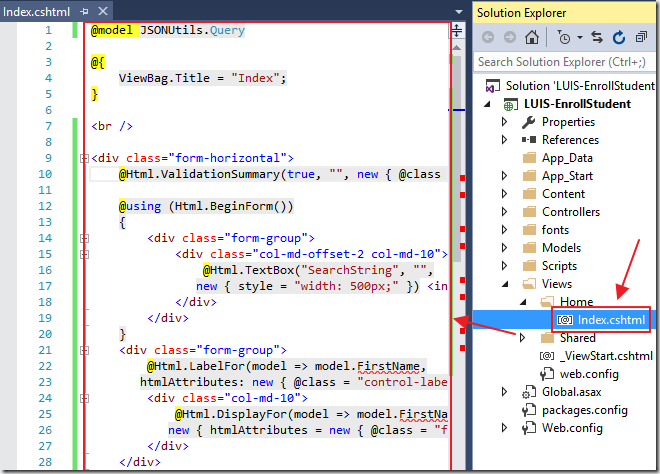
Replace all the contents of the file with the following markup:
@model JSONUtils.Query
@{
    ViewBag.Title = "Index";
}
<br />
<div class="form-horizontal">
    @Html.ValidationSummary(true, "", new { @class = "text-danger" })
    @using (Html.BeginForm())
    {
        <div class="form-group">
            <div class="col-md-offset-2 col-md-10">
                @Html.TextBox("SearchString", "",
               new { style = "width: 500px;" }) <input type="submit" value="Search" />
            </div>
        </div>
    }
    <div class="form-group">
        @Html.LabelFor(model => model.FirstName,
       htmlAttributes: new { @class = "control-label col-md-2" })
        <div class="col-md-10">
            @Html.DisplayFor(model => model.FirstName,
           new { htmlAttributes = new { @class = "form-control" } })
        </div>
    </div>
    <div class="form-group">
        @Html.LabelFor(model => model.LastName,
       htmlAttributes: new { @class = "control-label col-md-2" })
        <div class="col-md-10">
            @Html.DisplayFor(model => model.LastName,
           new { htmlAttributes = new { @class = "form-control" } })
        </div>
    </div>
    <div class="form-group">
        @Html.LabelFor(model => model.Class,
       htmlAttributes: new { @class = "control-label col-md-2" })
        <div class="col-md-10">
            @Html.DisplayFor(model => model.Class,
           new { htmlAttributes = new { @class = "form-control" } })
        </div>
    </div>
    <div class="form-group">
        @Html.LabelFor(model => model.Period,
       htmlAttributes: new { @class = "control-label col-md-2" })
        <div class="col-md-10">
            @Html.DisplayFor(model => model.Period,
           new { htmlAttributes = new { @class = "form-control" } })
        </div>
    </div>
</div>
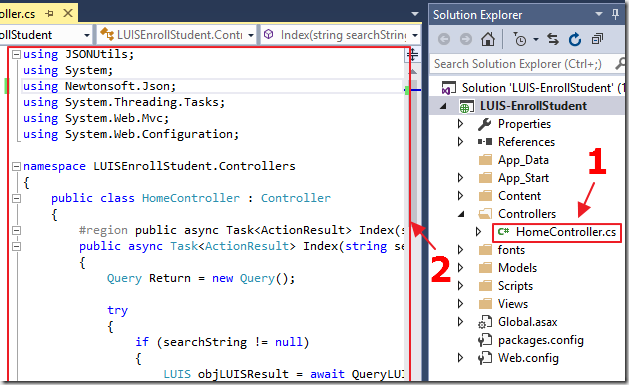
Open the Controllers/HomeController.cs file.
Replace all the contents of the file with the following code:
using JSONUtils;
using System;
using Newtonsoft.Json;
using System.Threading.Tasks;
using System.Web.Mvc;
using System.Web.Configuration;
namespace LUISEnrollStudent.Controllers
{
    public class HomeController : Controller
    {
        #region public async Task<ActionResult> Index(string searchString)
        public async Task<ActionResult> Index(string searchString)
        {
            Query Return = new Query();
            try
            {
                if (searchString != null)
                {
                    LUIS objLUISResult = await QueryLUIS(searchString);
                    foreach (var item in objLUISResult.entities)
                    {
                        if (item.type == "Student Name::First Name")
                        {
                            Return.FirstName = item.entity;
                        }
                        if (item.type == "Student Name::Last Name")
                        {
                            Return.LastName = item.entity;
                        }
                        if (item.type == "Class")
                        {
                            Return.Class = item.entity;
                        }
                        if (item.type == "Period")
                        {
                            Return.Period = item.entity;
                        }
                    }
                }
                return View(Return);
            }
            catch (Exception ex)
            {
                ModelState.AddModelError(string.Empty, "Error: " + ex);
                return View(Return);
            }
        }
        #endregion
        // Utility
        #region private static async Task<Example> QueryLUIS(string Query)
        private static async Task<LUIS> QueryLUIS(string Query)
        {
            LUIS LUISResult = new LUIS();
            var LUISQuery = Uri.EscapeDataString(Query);
            using (System.Net.Http.HttpClient client = new System.Net.Http.HttpClient())
            {
                // Get key values from the web.config
                string LUIS_Url = WebConfigurationManager.AppSettings["LUIS_Url"];
                string LUIS_Subscription_Key = WebConfigurationManager.AppSettings["LUIS_Subscription_Key"];
                string RequestURI = String.Format("{0}?subscription-key={1}&q={2}",
                    LUIS_Url, LUIS_Subscription_Key, LUISQuery);
                System.Net.Http.HttpResponseMessage msg = await client.GetAsync(RequestURI);
                if (msg.IsSuccessStatusCode)
                {
                    var JsonDataResponse = await msg.Content.ReadAsStringAsync();
                    LUISResult = JsonConvert.DeserializeObject<LUIS>(JsonDataResponse);
                }
            }
            return LUISResult;
        }
        #endregion
    }
}
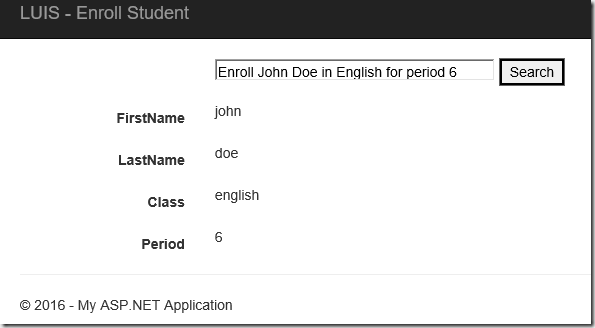
Hit F5 in Visual Studio to run the application.
The application is now complete.
Links
Language Understanding Intelligent Service (LUIS)
LUIS: Language Understanding Intelligent Service (beta)
An Interactive Bot Application With LUIS Using Microsoft Bot Framework
Research Papers
Download
You can download the code from the Download page