9/18/2016 Webmaster
Implementing A SQL Server Database With The Microsoft Bot Framework
Microsoft Bot Framework Chatbot applications that require information to be stored, queried, and shared with multiple users, will require a central storage repository. Using Microsoft SQL Server and Microsoft Azure, will allow you to easily implement this feature.
To demonstrate implementing a database with a Microsoft Bot Framework application, we will start with the code from the article: Using Images, Cards, Carousels, and Buttons In The Microsoft Bot Framework (you can download the code for this article from the Downloads page).
Create The SQL Server Database
We will start by creating a database and logging the messages sent to and from the Bot.
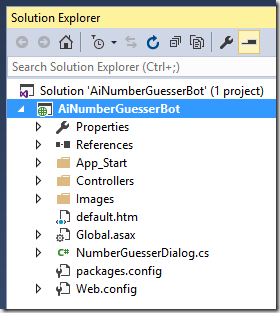
Open the project in Visual Studio.
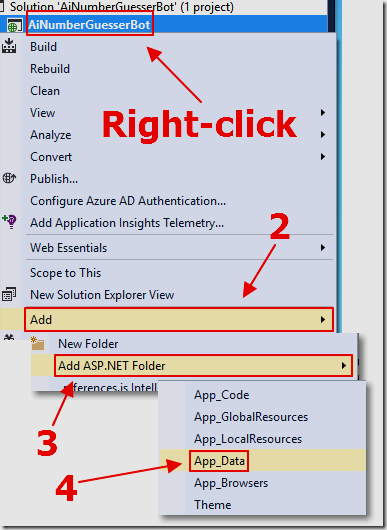
In the Solution Explorer in Visual Studio, right-click on the Project (not the Solution), and select Add, then Add ASP.NET Folder, then App_Data.
Note: App_Data is a special folder that will contain the database we will create. We use this folder because we will have an option to not deploy this folder (and the database that it will contain) when we publish the application to Azure (this will be covered later).
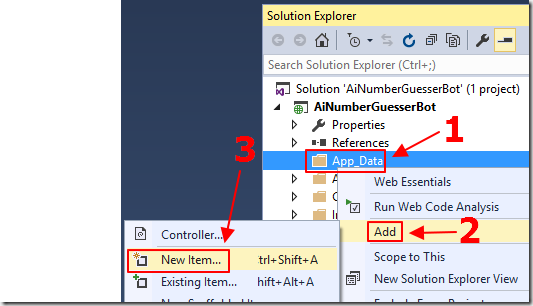
Right-click on the App_Data folder, then select Add then New Item.
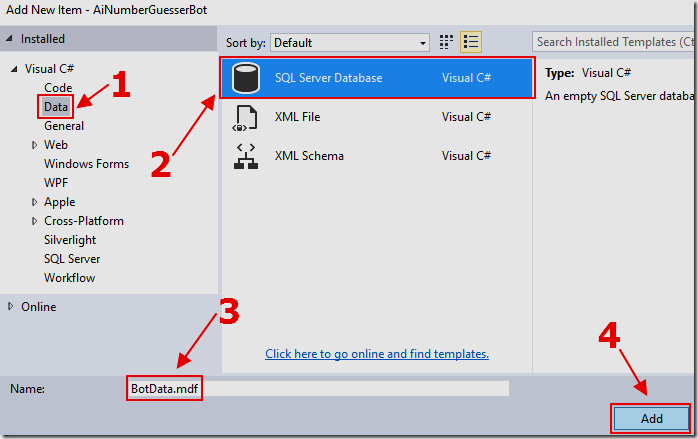
Add a SQL Server Database.
Name it BotData.mdf.
We will now create a table in the database to hold our data.
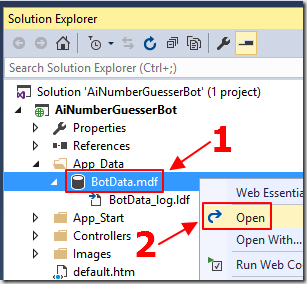
Right-click on the database and select Open.
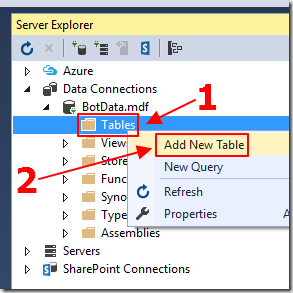
Expand the database elements in the tree.
Right-click on Tables and select Add New Table.
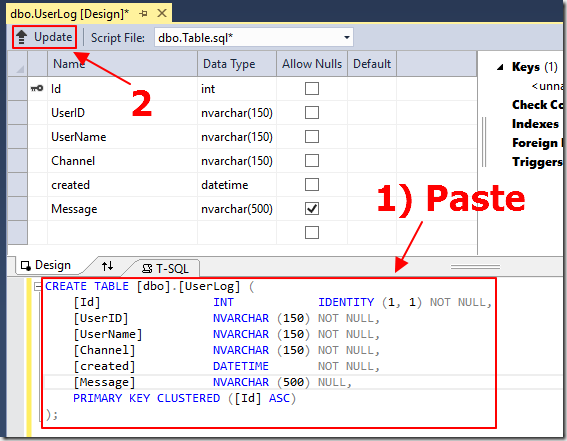
Paste the following script in and click the Update button:
CREATE TABLE [dbo].[UserLog] ([Id] INT IDENTITY (1, 1) NOT NULL,[UserID] NVARCHAR (150) NOT NULL,[UserName] NVARCHAR (150) NOT NULL,[Channel] NVARCHAR (150) NOT NULL,[created] DATETIME NOT NULL,[Message] NVARCHAR (500) NULL,PRIMARY KEY CLUSTERED ([Id] ASC));
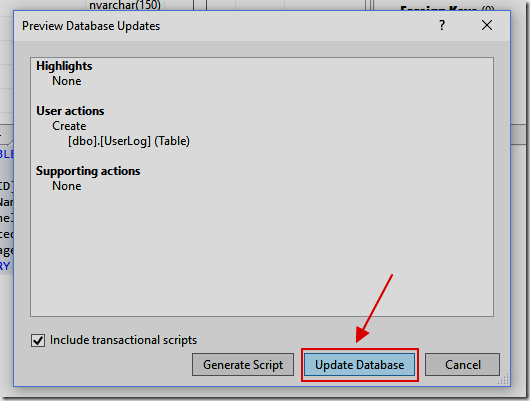
Click Update Database.

The table will be created.
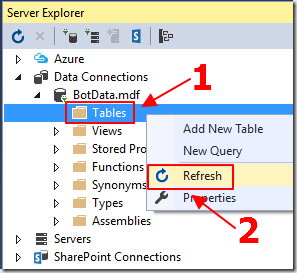
Right-click on the Tables node and select Refresh.
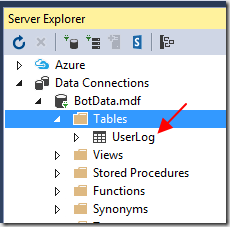
The table will show.
Create An ADO.NET Entity Data Model
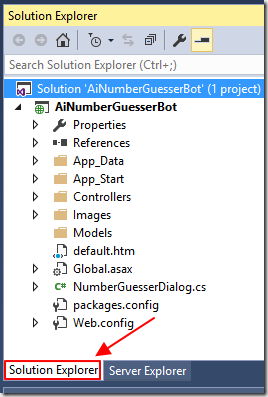
We will now create an Entity Data Model to allow programmatic access to the database.
Switch to Solution Explorer view.
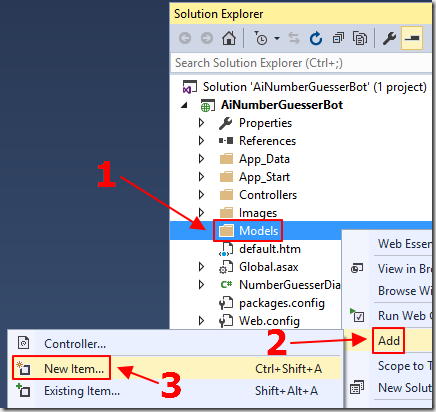
Create a folder called Models.
Right-click on the Models folder and select Add then New Item.
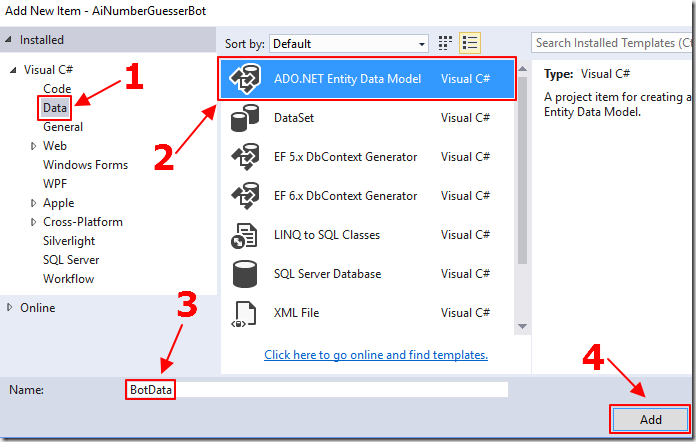
Add an ADO.NET Entity Data Model and call it BotData.
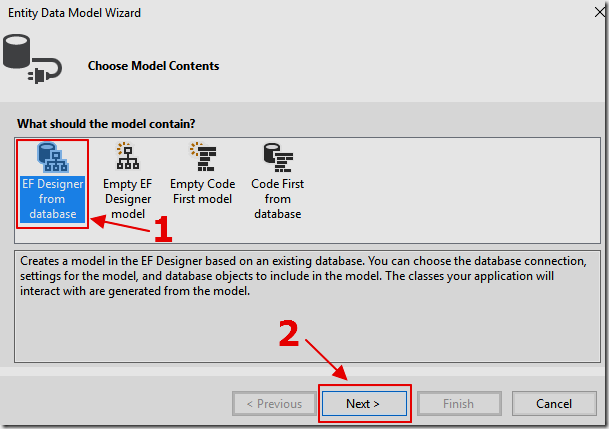
When the Entity Data Model Wizard opens, select EF Designer from database.
Click Next.
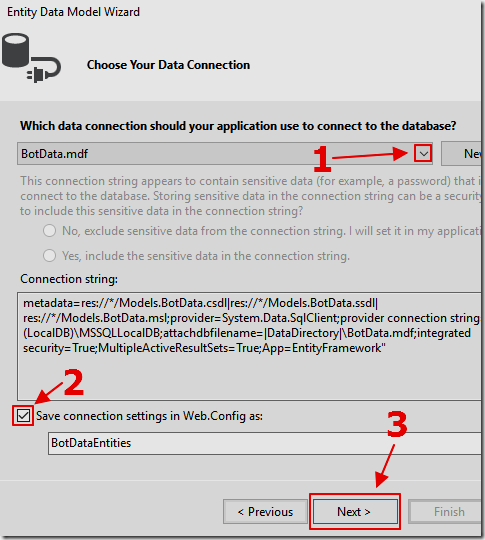
Select BotData.mdf in the database dropdown (if it is not already selected).
Check the box next to Save connection settings in Web.Config.
Click Next.
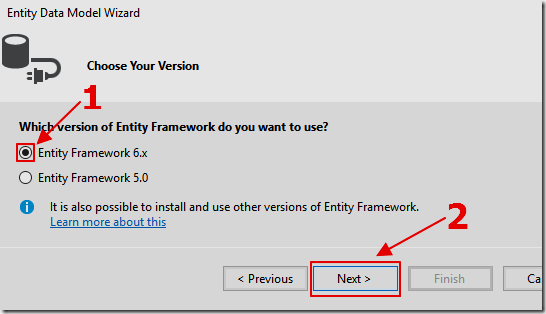
Select Entity Framework 6.x.
Click Next.
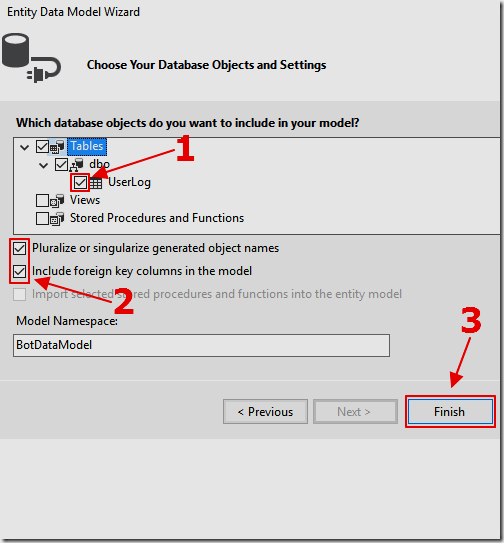
Expand the tree to reveal the UserLog table and click the checkbox next to it.
Accept the other default values.
Click Finish.
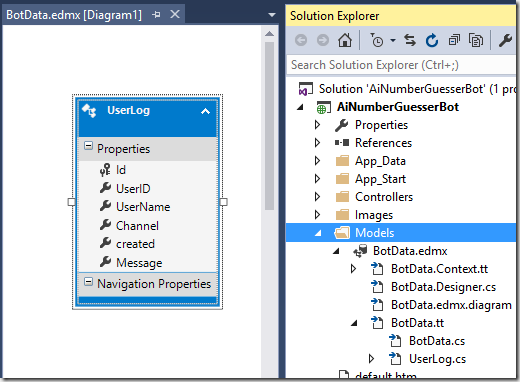
The BotData.edmx an Entity Data Model will be created.
You can close the BotData.edmx for now.
Log To The Database
We will now create code that will log (most of) the messages to and from the Bot to the database.
First, create a file called Utility.cs and use the following code:
namespace AiNumberGuesserBot{public static class Utility{public static string Truncate(this string value, int maxLength){if (string.IsNullOrEmpty(value)) return value;return value.Length <= maxLength ? value : value.Substring(0, maxLength);}}}
This creates a utility method to allow us to trim any text we store in the database. This ensures that no message is too long to be stored in the database (this would throw an error).
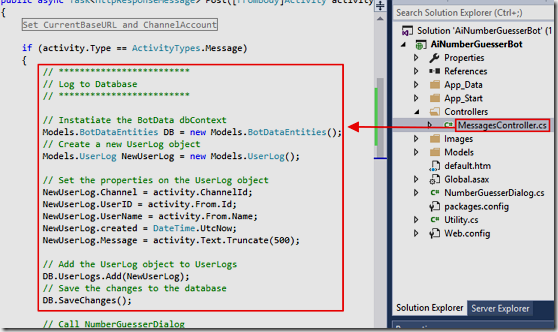
Next, find the following code in MessagesController.cs:
// Call NumberGuesserDialogawait Conversation.SendAsync(activity, () => new NumberGuesserDialog());
Replace it with:
// *************************// Log to Database// *************************// Instantiate the BotData dbContextModels.BotDataEntities DB = new Models.BotDataEntities();// Create a new UserLog objectModels.UserLog NewUserLog = new Models.UserLog();// Set the properties on the UserLog objectNewUserLog.Channel = activity.ChannelId;NewUserLog.UserID = activity.From.Id;NewUserLog.UserName = activity.From.Name;NewUserLog.created = DateTime.UtcNow;NewUserLog.Message = activity.Text.Truncate(500);// Add the UserLog object to UserLogsDB.UserLogs.Add(NewUserLog);// Save the changes to the databaseDB.SaveChanges();// Call NumberGuesserDialogawait Conversation.SendAsync(activity, () => new NumberGuesserDialog());
This code logs the messages being sent from the user to the Bot.
Log Messages In The Dialog Class
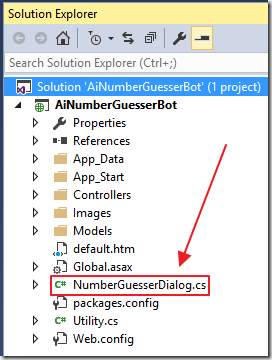
The Dialog class creates a response to the user.
Find all code in the NumberGuessserDialog.cs file (there will be multiple places), that send a text response to the user, that contain these lines:
await context.PostAsync(replyToConversation);context.Wait(MessageReceivedAsync);
Add the following code above the existing lines of code (again, there will be multiple places you will do this):
// *************************// Log to Database// *************************// Instantiate the BotData dbContextModels.BotDataEntities DB = new Models.BotDataEntities();// Create a new UserLog objectModels.UserLog NewUserLog = new Models.UserLog();// Set the properties on the UserLog objectNewUserLog.Channel = replyToConversation.ChannelId;NewUserLog.UserID = replyToConversation.From.Id;NewUserLog.UserName = replyToConversation.From.Name;NewUserLog.created = DateTime.UtcNow;// This logs the message being sent to the userNewUserLog.Message = replyToConversation.Text.Truncate(500);// Add the UserLog object to UserLogsDB.UserLogs.Add(NewUserLog);// Save the changes to the databaseDB.SaveChanges();
When we have a PromptDialog we don’t have a Reply Activity. In this case we need to make one so that we have the values we need to log to the database.
Find the following code in the Dialog class:
PromptDialog.Confirm(context,PlayAgainAsync,CongratulationsStringPrompt,"Didn't get that!");
Add the following code above the existing lines of code:
// *************************// Log to Database// *************************// Create a reply ActivityActivity replyToConversation = (Activity)context.MakeMessage();// Instantiate the BotData dbContextModels.BotDataEntities DB = new Models.BotDataEntities();// Create a new UserLog objectModels.UserLog NewUserLog = new Models.UserLog();// Set the properties on the UserLog objectNewUserLog.Channel = replyToConversation.ChannelId;NewUserLog.UserID = replyToConversation.From.Id;NewUserLog.UserName = replyToConversation.From.Name;NewUserLog.created = DateTime.UtcNow;// This logs the message being sent to the userNewUserLog.Message = CongratulationsStringPrompt.Truncate(500);// Add the UserLog object to UserLogsDB.UserLogs.Add(NewUserLog);// Save the changes to the databaseDB.SaveChanges();
(Note that the CongratulationsStringPrompt is set by the existing code to indicate that the user has won the game)
Test The Database Logging Code
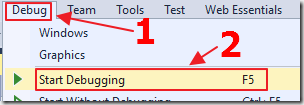
Hit F5 to run the application.
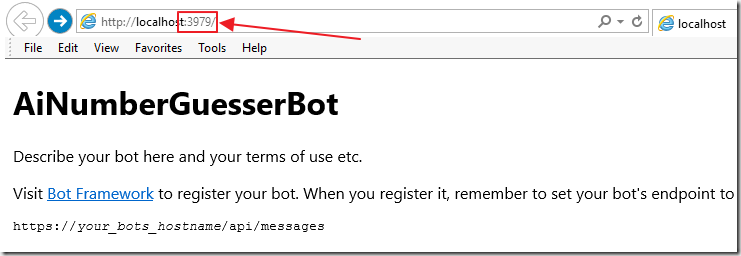
The web browser will open.
Note the port number and the web address.

Download, install, and run the Bot Framework Emulator (Windows) (also see: Mac and Linux support using command line emulator if you don’t have Windows).
When the emulator starts, connect to the Bot by setting the address to the the one indicted in the web browser (however, add /api/messages to the end).

Ensure that the Bot Url is connecting to the correct address.

Enter Hello and click the send button, to start a conversation with the Bot.
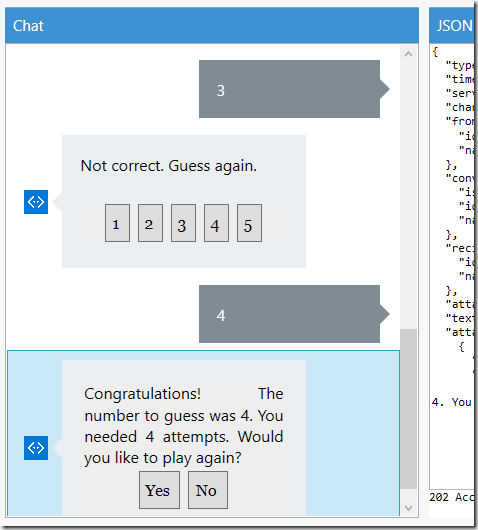
Play the game with the Bot.
Close the web browser to stop the application and return to Visual Studio.
View The Data
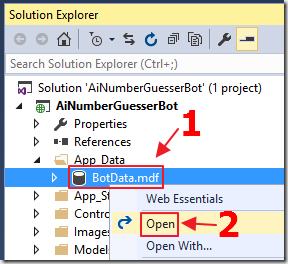
We will now view the data that was logged to the database.
In the Solution Explorer in Visual Studio, right-click on BotData.mdf and select Open.
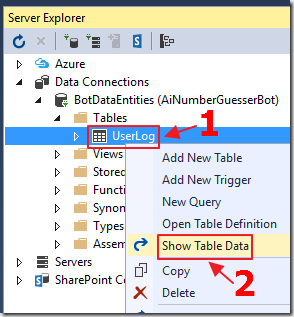
This will open the Server Explorer.
Right-click on the UserLog table and select Show Table Data.
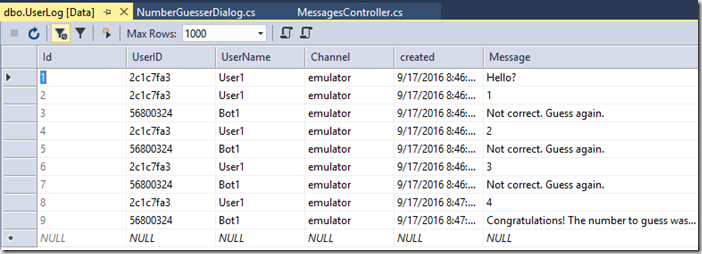
The logged data will be displayed.
Logging High Scores
We will now add code to log and display High Scores.
We have to alter the database first to store the number of turns required to win and the name of the winner.
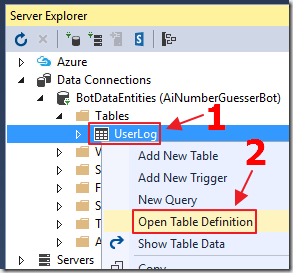
In the Server Explorer, right-click on the UserLog table and select Open Table Definition.
Note: If you don’t have this option, Install the latest SQL Server Data Tools (SSDT) from: https://msdn.microsoft.com/library/mt204009.aspx
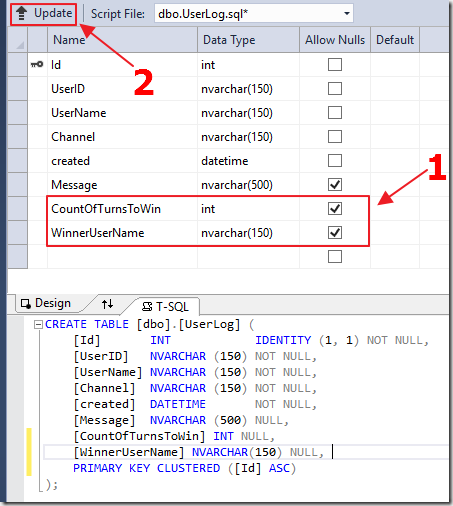
Add the following fields:
- CountOfTurnsToWin [int]
- WinnerUserName [nvarchar(150)]
Click the Update button.
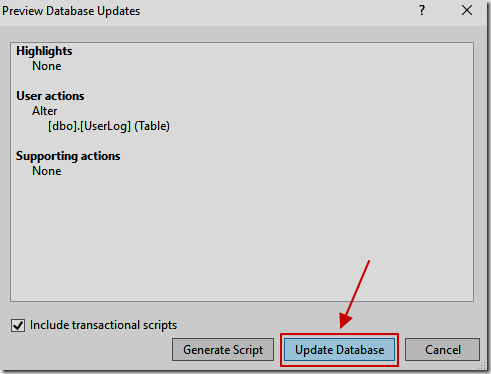
When the Preview Database Updates box shows, click Update Database.
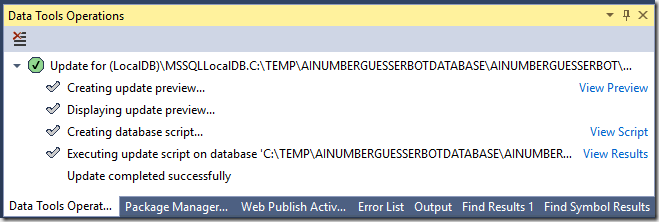
The Data Tools Operations window will indicate when the update is complete.
Update ADO.NET Entity Data Model
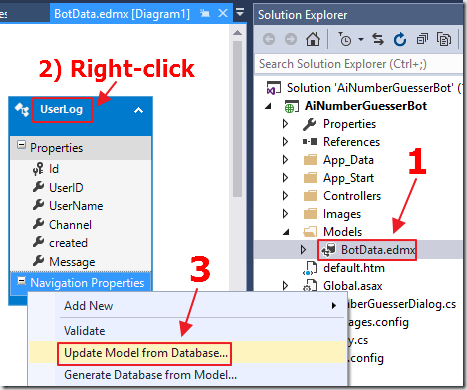
We have to update the ADO.NET Entity Data Model to have programmatic access to the newly added fields.
In the Solution Explorer, click on BotData.edmx to open it in the designer.
In the designer, right-click on the UserLog table, and select Update Model from Database.
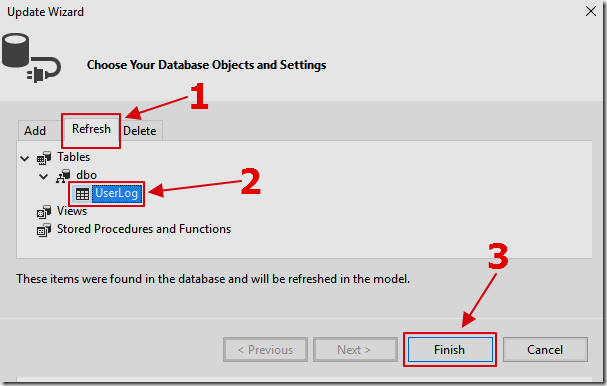
When the Update Wizard shows, select the Refresh tab, and then select the UserLog table, and click Finish.
Alter Code To Log High Scores
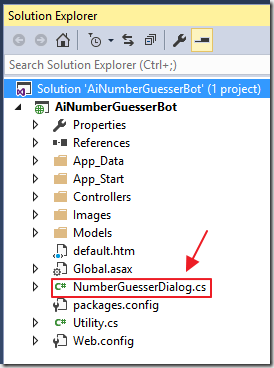
We will now alter the code in the Dialog class to log the winning user and the number of turns they required to win.
In the NumberGuesserDialog.cs file, locate the following code:
// *************************// Log to Database// *************************// Create a reply ActivityActivity replyToConversation = (Activity)context.MakeMessage();// Instantiate the BotData dbContextModels.BotDataEntities DB = new Models.BotDataEntities();// Create a new UserLog objectModels.UserLog NewUserLog = new Models.UserLog();// Set the properties on the UserLog objectNewUserLog.Channel = replyToConversation.ChannelId;NewUserLog.UserID = replyToConversation.From.Id;NewUserLog.UserName = replyToConversation.From.Name;NewUserLog.created = DateTime.UtcNow;// This logs the message being sent to the userNewUserLog.Message = CongratulationsStringPrompt.Truncate(500);
Add the following lines of code below the code above:
// Log the number of turns it took to winNewUserLog.CountOfTurnsToWin = this.intAttempts;// Log the name of the user who wonNewUserLog.WinnerUserName = replyToConversation.Recipient.Name;
Display The High Scores
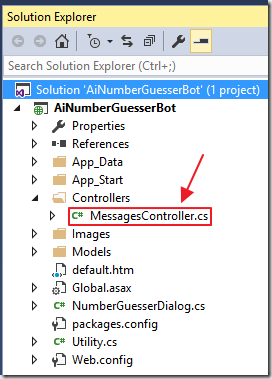
We will now add code to display the High Scores whenever the user types in High Scores.
Open the MessagesController.cs file and add the following method to the class:
private void ShowHighScores(Activity activity){// This method will take an Activity and return a response// that will contain the current High Scores// Connect to the databaseModels.BotDataEntities DB = new Models.BotDataEntities();// Get Yesterdayvar ParamYesterday = DateTime.Now.AddDays(-1);// Get the top 5 high scores since yesterdayvar HighScores = (from UserLog in DB.UserLogswhere UserLog.CountOfTurnsToWin != nullwhere UserLog.created > ParamYesterdayselect UserLog).OrderBy(x => x.CountOfTurnsToWin).Take(5).ToList();// Create a responseSystem.Text.StringBuilder sb = new System.Text.StringBuilder();sb.Append("High Scores Today:\n\n");// Loop through each high scoreforeach (var Score in HighScores){// Add the High Score to the responsesb.Append(String.Format("Score: {0} - {1} - ({2} {3})\n\n", Score.CountOfTurnsToWin, Score.WinnerUserName, Score.created.ToLocalTime().ToShortDateString(), Score.created.ToLocalTime().ToShortTimeString()));}// Create a reply messageActivity replyToConversation = activity.CreateReply();replyToConversation.Recipient = activity.From;replyToConversation.Type = "message";// Set the text containg the High Scores as the responsereplyToConversation.Text = sb.ToString();// Create a ConnectorClient and use it to send the reply messagevar connector =new ConnectorClient(new Uri(activity.ServiceUrl));// Send the replyconnector.Conversations.SendToConversationAsync(replyToConversation);}
We will now add the code that will call the ShowHighScores method we just added.
In the MessagesController.cs file, locate the following code:
// Call NumberGuesserDialogawait Conversation.SendAsync(activity, () => new NumberGuesserDialog());
Replace it with the following code:
// Detect if the user enters the words "high score"if (activity.Text.ToLower().Contains("high score")){// Call the ShowHighScores method// passing to it, the current ActivityShowHighScores(activity);}else{// Call NumberGuesserDialogawait Conversation.SendAsync(activity, () => new NumberGuesserDialog());}
Finally, to let the user know they can enter High Scores to see the high scores, find the following code in the Dialog class:
Activity replyToConversation =ShowButtons(context, "Hi Welcome! - Guess a number between 1 and 5");
Change it to:
Activity replyToConversation =ShowButtons(context,"Hi Welcome! - Guess a number between 1 and 5 \n\n Type 'High Scores' to see high scores");
Test The Code
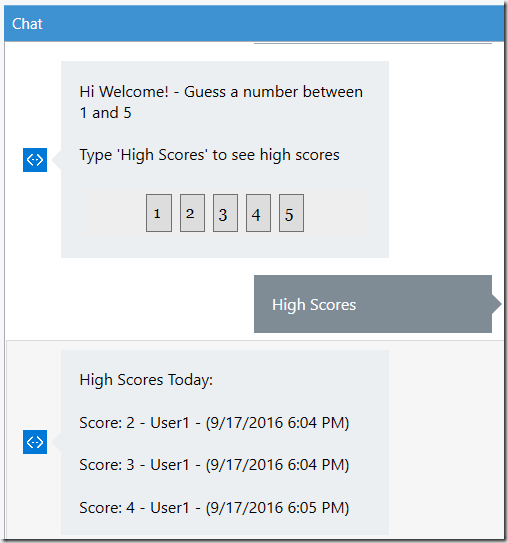
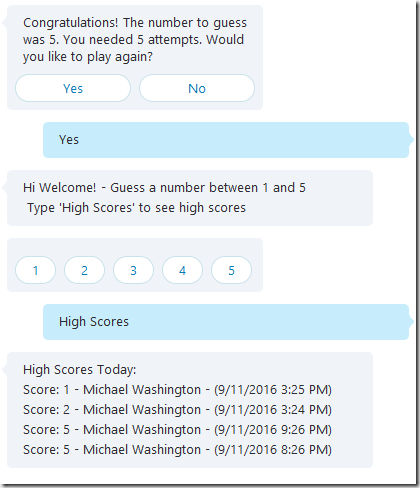
Now when we type High Scores we can see the high scores for the past day.
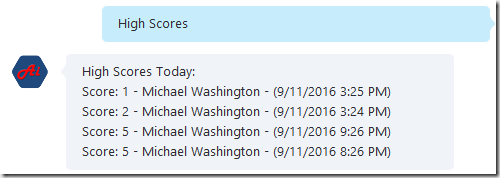
The image above shows what the high scores looks like when the Bot is published and viewed through the Skype client.
Publishing A Microsoft Bot Framework Application That Uses a Database
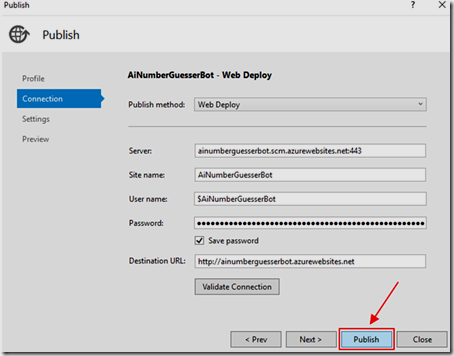
To publish the Bot, we can follow the directions in the article: Creating a Skype Bot Using The Microsoft Bot Framework.
However, it does not cover publishing a Bot that uses a database.
For full directions, see the article: SQL Database tutorial: Create a SQL database in minutes by using the Azure portal.
This will require using Microsoft Azure.
If you do not have a Microsoft Azure account, go to https://azure.microsoft.com and create an account and a subscription.
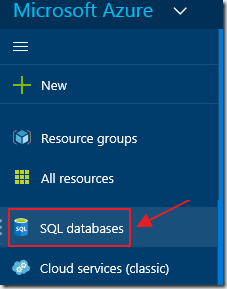
Log into the Azure web portal and select SQL databases.

Add a new database.
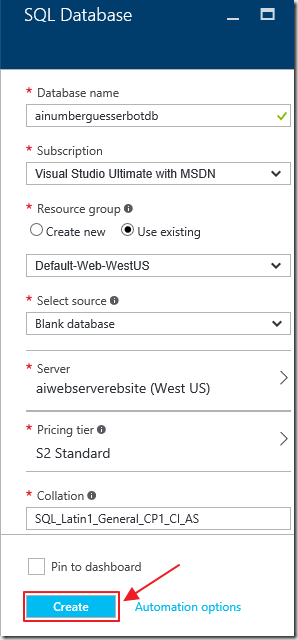
Fill in the form to create a new database.
Note: If you do not already have a server to put the database on you will be prompted to create one. At that time, you will create a user name and password. This is the user name and password that you will use in the connection string to connect to the database when you use the deployment wizard in Visual Studio (covered later).
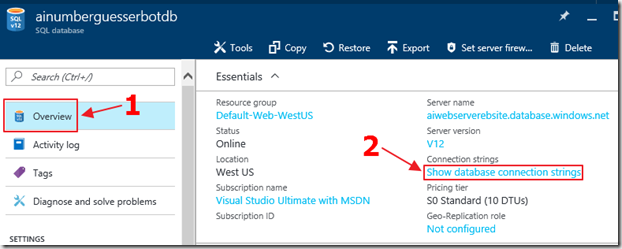
After you create the database, you can view the ADO.NET(SQL authentication) connection string for the database in the Overview section.
Note: The connection string will not have the username and password. You will use the username and password of the Azure server that contains the database.
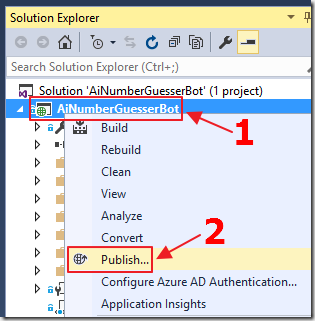
In the Solution Explorer in Visual Studio, right-click on the project node and select Publish.
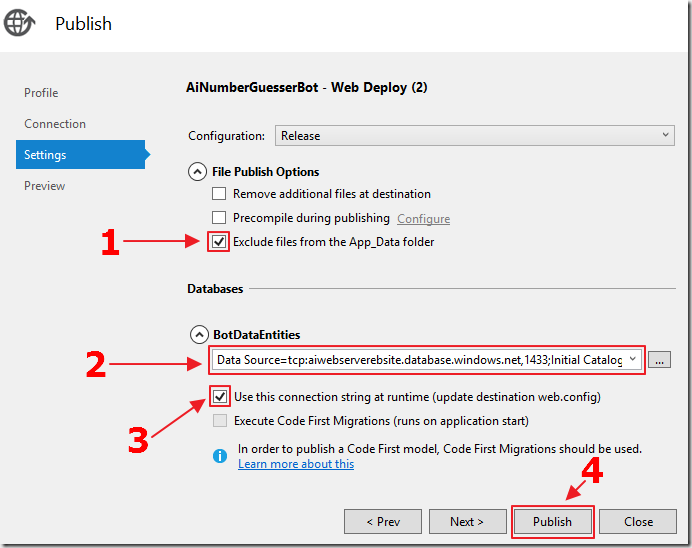
In the Publish wizard, fill out the fields to publish your Bot to Azure.
On the Settings tab:
- Select Exclude files from the App_Data folder.This will prevent the BotData.mdf database file from being published to Azure. You are doing this because the .mdf file cannot be used on Azure.
- Enter the connection string to the database in (running on Azure). You can get the ADO.NET(SQL authentication) connection string for the database in the Overview section for the database in the Azure portal. Use the “…” button to help you connect to the database and construct the connection string.
- Check Use this connection string at runtime. This will update the web.config of the published application so that the published application will connect to the database on Azure.
- Click the Publish button.
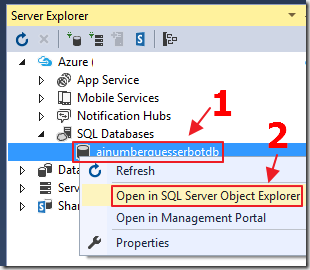
In the Server Explorer in Visual Studio, right-click on the database and select Open in SQL Server Object Explorer.
Note: If you don’t have this option, Install the latest SQL Server Data Tools (SSDT) from: https://msdn.microsoft.com/library/mt204009.aspx
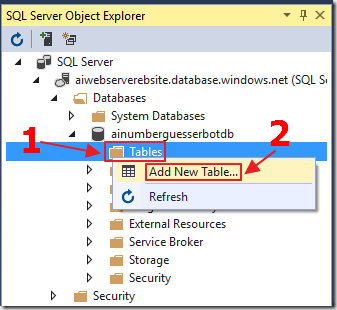
This will open the SQL Server Object Explorer.
Right-click on the Tables node under the database and select Add New Table.
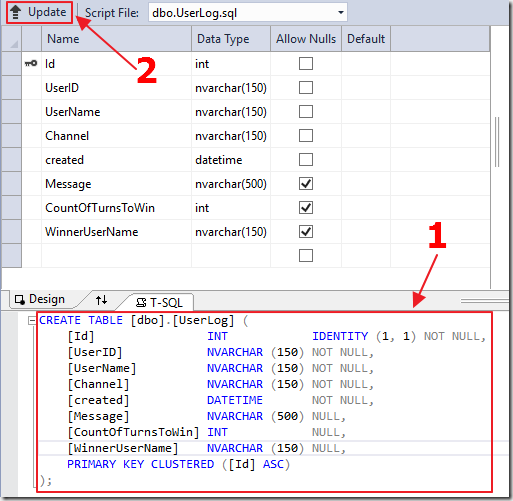
Use the following script to create the required table, and click the Update button:
CREATE TABLE [dbo].[UserLog] ([Id] INT IDENTITY (1, 1) NOT NULL,[UserID] NVARCHAR (150) NOT NULL,[UserName] NVARCHAR (150) NOT NULL,[Channel] NVARCHAR (150) NOT NULL,[created] DATETIME NOT NULL,[Message] NVARCHAR (500) NULL,[CountOfTurnsToWin] INT NULL,[WinnerUserName] NVARCHAR (150) NULL,PRIMARY KEY CLUSTERED ([Id] ASC));

When the Preview Database Updates box shows, click Update Database.
Note: You can also use the Cloud Explorer for Visual Studio 2015 extension to mange your Azure databases inside Visual Studio.
Ai Help Website Links
Creating a Hello World! Bot Using The Microsoft Bot Framework
Introduction To Using Dialogs With The Microsoft Bot Framework
Creating a Skype Bot Using The Microsoft Bot Framework
Microsoft Links
Bot Framework Forum (stack overflow)
SQL Database tutorial: Create a SQL database in minutes by using the Azure portal
Download
You can download the code from the Download page
